
Building a Conversational Blog Assistant on AWS
Part 3 of the "Generative AI on Cloud" Series

Welcome back to the "Generative AI on Cloud" series! In Part 2, we built an end-to-end blog generation application using Amazon Bedrock, AWS Lambda, API Gateway, and S3, demonstrating how foundational models like Meta’s Llama 3 can generate content from a simple topic input. While that solution was powerful for static blog creation, it lacked the interactivity and context-awareness needed for dynamic, conversational applications.
Today, in Part 3, we’ll take a step toward building a conversational AI assistant that can engage users, maintain context over multiple interactions, and generate insightful content—all powered by AWS Cloud services. We’ll explore how to integrate LangChain, AWS Bedrock, and Streamlit to create a chatbot-like application for blog-related tasks. This foundation will set the stage for even more advanced techniques, like vector databases and retrieval-augmented generation (RAG), which we’ll dive into later in this series.
By the end of this installment, you’ll understand how these tools work together to enable interactive, context-aware AI workflows on the cloud. Let’s get started!
Thanks for reading NextGenProdMan’s Substack! Subscribe for free to receive new posts and support my work.
The Architecture We’re Exploring
To build a conversational blog assistant, we’ll leverage a robust architecture combining AWS Bedrock’s foundational models, LangChain’s orchestration capabilities, and Streamlit’s user-friendly interface. Here’s an overview of the components and their interactions:
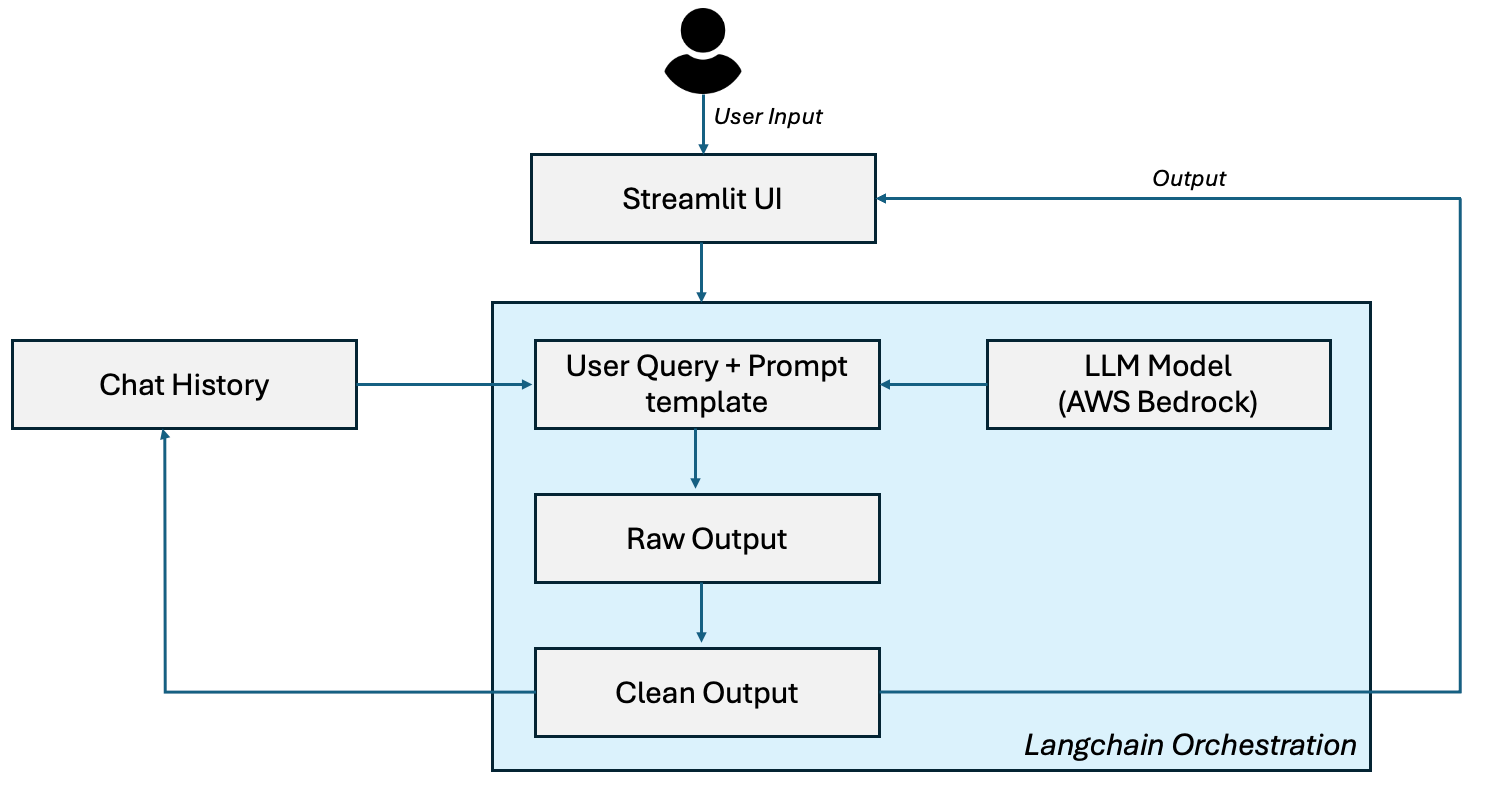
Streamlit (User Interface): This serves as the frontend where users interact with the chatbot. Users input questions or blog-related prompts (e.g., “What is Generative AI?”), and Streamlit displays the AI’s responses in a clean, interactive web interface. Represented as a blue rectangle with a crown icon, Streamlit acts as the entry and exit point for user engagement.
User Question: The user’s input, such as “What is Generative AI?” or “Generate a blog on AI ethics,” is captured and passed through the system. This is depicted as an oval shape labeled “Question: <User Input>,” initiating the workflow.
Past Message History: To maintain context across conversations, we’ll use LangChain’s memory management. This component, shown as a green rectangle labeled “Past Message History: Q1: How does Bedrock work? A: Bedrock is…,” stores previous interactions, enabling the chatbot to understand the conversation’s history and provide coherent, context-aware responses.
LangChain - ConversationChain: At the heart of our architecture, LangChain orchestrates the conversational flow. Represented by a central gray rectangle with a chain link icon, it combines the user’s current question with past messages to create a dynamic prompt (e.g., “Prompt: Past messages + Question”). LangChain’s ConversationChain ensures the AI maintains a natural, flowing dialogue, preparing the enriched prompt for AWS Bedrock. You can refer to this video to understand Langchain better:
AWS Bedrock: This component leverages Amazon Bedrock’s foundational models, such as Meta Llama 3 70B or Anthropics’s Claude, to generate responses based on the prompt crafted by LangChain. Depicted as a dark blue rectangle with a brain icon and labeled “AWS Bedrock FM,” it processes the input to produce intelligent, context-aware outputs.
Output Parser: After Bedrock generates a response, an output parser formats the raw text into a clean, user-friendly answer. Shown as an oval shape labeled “Output Parser: Answer,” it ensures the response is structured and ready for display.
Streamlit (Response Display): The final step returns the parsed answer to the user through Streamlit, shown as another blue rectangle with a crown icon, labeled “Answer: X/Y/Z” (e.g., “Generative AI creates content like text, images…”). This completes the conversational loop, displaying the result in the user interface.
LangChain Memory: Underpinning the conversation, LangChain’s memory system—depicted as a purple brain icon with “Read” and “Write” arrows—stores and retrieves conversation history using ConversationBufferMemory. This ensures the chatbot remembers past interactions, enhancing its ability to provide contextually relevant responses over time.
Prerequisites
Before we dive into building our conversational blog assistant with LangChain, AWS Bedrock, and Streamlit, you’ll need to set up your development environment and configure the necessary tools and services. Below are the essential prerequisites, along with their importance and step-by-step instructions.
Download VS Code
Importance: Visual Studio Code (VS Code) is a lightweight, extensible code editor that provides an ideal environment for writing, debugging, and managing Python code, as well as integrating with AWS and other tools via extensions. It’s essential for developing, testing, and deploying the application efficiently.
How to Do It:
Visit the official VS Code website at code.visualstudio.com.
Download the installer for your operating system (Windows, macOS, or Linux).
Run the installer and follow the prompts to install VS Code.
Optionally, install the Python, AWS Toolkit, and Jupyter extensions from the VS Code marketplace to enhance your workflow for this project.
Install Python
Importance: Python is the primary programming language for this project, used for coding the Lambda functions, LangChain workflows, and Streamlit interface. It’s critical to have a compatible version (e.g., Python 3.9 or later) to ensure compatibility with AWS SDKs, LangChain, and other dependencies.
How to Do It:
Visit python.org/downloads and download the latest version of Python 3.x.
Run the installer, ensuring you check the box to add Python to your system PATH.
Verify the installation by opening a terminal or command prompt and typing python --version (or python3 --version on some systems) to confirm the installed version.
Install pip, Python’s package manager, if not already included (it’s bundled with recent Python versions).
Install AWS CLI
Importance: The AWS Command Line Interface (CLI) allows you to interact with AWS services programmatically, such as configuring IAM roles, managing Bedrock models, and setting up Lambda functions. It’s essential for automating and managing cloud resources from your local machine.
How to Do It:
Open a terminal or command prompt.
Run curl "https://awscli.amazonaws.com/AWSCLIV2.pkg" -o "AWSCLIV2.pkg" (for macOS) or follow the installation instructions for Windows/Linux at docs.aws.amazon.com/cli/latest/userguide/install-cliv2.html.
Install the package and verify the installation by typing aws --version in the terminal.
Update the CLI periodically with aws --update to ensure compatibility with AWS services.
Configure IAM Role for VS Code
Importance: An Identity and Access Management (IAM) role or user with appropriate permissions is crucial for VS Code to securely interact with AWS services (e.g., Bedrock, Lambda, S3). This ensures you can invoke models, manage resources, and deploy code without security risks.
How to Do It:
Log in to the AWS Management Console and navigate to the IAM service.
Create an IAM user or role with permissions for bedrock:InvokeModel, lambda:InvokeFunction, s3:PutObject, and other necessary actions (e.g., via a custom policy or the AWS Managed Policy AWSLambdaBasicExecutionRole).
Generate access keys (Access Key ID and Secret Access Key) for the IAM user.
In VS Code, install the AWS Toolkit extension, configure it with your AWS credentials via the AWS CLI (aws configure), and test connectivity to AWS services.
Anaconda Navigator Download
Importance: Anaconda Navigator provides a user-friendly interface for managing Python environments, packages, and Jupyter notebooks, which can simplify dependency management and testing for this project. It’s particularly useful for ensuring compatibility between Python, Boto3, LangChain, and Streamlit.
How to Do It:
Visit anaconda.com/download and download Anaconda for your operating system.
Run the installer, following the prompts to install Anaconda (accept the default settings for most users).
Launch Anaconda Navigator, create a new environment (e.g., named “blog-assistant”) with Python 3.9 or later, and use it to manage packages for this project.
Install Boto3
Importance: Boto3 is the AWS SDK for Python, enabling programmatic access to AWS services like Bedrock, Lambda, and S3. It’s critical for interacting with these services within your Lambda functions and local development environment.
How to Do It:
Open a terminal or Anaconda Prompt.
Activate your Python environment (e.g., conda activate blog-assistant if using Anaconda).
Run pip install boto3 to install the latest version of Boto3.
Verify the installation by running python -c "import boto3; print(boto3.version)" in the terminal.
Install LangChain
Importance: LangChain is a framework for building applications with large language models, enabling features like conversation chains, memory, and prompt engineering. It’s the backbone of our conversational logic, connecting AWS Bedrock with user interactions.
How to Do It:
In the same terminal or Anaconda environment, run pip install langchain.
Optionally, install additional LangChain integrations (e.g., pip install langchain-aws) for AWS-specific functionality.
Test the installation by running python -c "import langchain; print(langchain.version)".
Install Streamlit
Importance: Streamlit is a Python library for creating interactive web applications, ideal for building the user interface for our chatbot. It’s crucial for providing a seamless, real-time experience for users to input questions and view responses.
How to Do It:
In your terminal or Anaconda environment, run pip install streamlit.
Verify the installation by running streamlit hello in the terminal to launch a sample Streamlit app.
Ensure your Python environment is configured to run Streamlit locally before deploying to AWS or testing with Bedrock.
Set Up AWS Bedrock
Importance: AWS Bedrock provides access to foundational models like Meta Llama 3, which power the generative capabilities of our chatbot. Configuring Bedrock ensures you can invoke these models securely and efficiently from your application.
How to Do It:
Log in to the AWS Management Console and navigate to Amazon Bedrock using the search bar.
Go to “Model access” and click “Modify model access” to enable access to models like Meta Llama 3 70B Instruct.
Configure IAM permissions (as done in Step 4) to allow bedrock:InvokeModel for your IAM role or user.
Test Bedrock connectivity using Boto3 in VS Code or a Python script (e.g., boto3.client("bedrock-runtime")).
Configure AWS Profile
Importance: An AWS profile in the AWS CLI stores your credentials and configuration, enabling seamless authentication across tools like Boto3, VS Code, and the CLI. It’s critical for maintaining secure, consistent access to AWS services without repeatedly entering credentials.
How to Do It:
In a terminal, run aws configure and enter your Access Key ID, Secret Access Key, region (e.g., us-east-1), and output format (e.g., json).
Optionally, create multiple profiles (e.g., aws configure --profile blog-assistant) for different projects or environments.
Verify the profile by running aws sts get-caller-identity to ensure it’s correctly configured and authenticated.
By completing these prerequisites, you’ll have a fully equipped development environment ready to build and test the conversational blog assistant. Each step ensures compatibility, security, and efficiency, setting the foundation for the hands-on implementation in the following sections.
Now that we have covered the building blocks of our ChatBot, let’s get to the coding part starting with code covering backend functionality.
Understanding the Backend Components
The backend is responsible for processing user inputs, leveraging AWS Bedrock’s models via LangChain, and maintaining context across conversations. Here are the main parts of the code and why they matter:
Importing LangChain Modules:
We import key LangChain components like ConversationChain, ConversationSummaryBufferMemory, and ChatBedrock (from langchain_aws) to build a conversational AI system. These modules are critical because they provide the framework for chaining language model operations, managing memory, and integrating with AWS Bedrock seamlessly. Without them, we’d lack the tools to orchestrate complex, context-aware interactions.
Initializing the Bedrock Model Connection:
A function establishes a connection to AWS Bedrock, specifying credentials, model ID, and inference parameters (e.g., temperature, max tokens). This step is vital because it defines how the foundational model (e.g., Anthropic Claude 3 Haiku) behaves, ensuring high-quality, controlled responses tailored to our blog assistant’s needs. Proper configuration prevents issues like overly verbose or incoherent outputs.
Creating Conversation Memory:
We implement ConversationSummaryBufferMemory to store and summarize past interactions, limiting them to a token count (e.g., 300 tokens). This is important for maintaining context without overwhelming the model, enabling the chatbot to understand the conversation’s flow while keeping performance efficient. Memory management is key for realistic, multi-turn conversations.
Building the Conversation Chain:
A ConversationChain ties together the language model, memory, and user input to generate responses. This component is crucial because it orchestrates the entire conversational workflow, ensuring the model uses both the current prompt and historical context to produce coherent, context-aware replies. It’s the backbone of our interactive AI.
Generating Chat Responses:
Using the invoke method, we process user inputs through the conversation chain to generate responses. This step is essential for delivering real-time, dynamic answers to users, leveraging the power of Bedrock’s models and LangChain’s chaining capabilities. It ensures the backend can handle interactive queries effectively.
Together, these components create a robust backend that powers the conversational logic, integrates with AWS services, and prepares responses for the Streamlit frontend. Now, let’s look at a sample code snippet you can use in your development environment.
Sample Backend Code Snippet
Below is a Python script for the backend, which you can run in VS Code or your preferred IDE after setting up the prerequisites. Ensure you have installed langchain-aws and anthropic via pip install -U langchain-aws anthropic.
python
# Import LangChain modules for conversation management and AWS Bedrock integration
from langchain.chains import ConversationChain
from langchain.memory import ConversationSummaryBufferMemory
from langchain_aws import ChatBedrock

# 1. Function to initialize the Bedrock model connection
def initialize_blog_llm():
    blog_llm = ChatBedrock(
        credentials_profile_name='default',
        model_id='anthropic.claude-3-haiku-20240307-v1:0',
        model_kwargs={
            "max_tokens": 300,
            "temperature": 0.1,
            "top_p": 0.9,
            "stop_sequences": ["\\n\\nHuman:"]
        }
    )
    return blog_llm

# 2. Function to create conversation memory
def create_conversation_memory():
    llm_instance = initialize_blog_llm()
    memory_instance = ConversationSummaryBufferMemory(llm=llm_instance, max_token_limit=300)
    return memory_instance

# 3. Function to build and manage the conversation chain
def manage_blog_conversation(user_query, memory_instance):
    llm_instance = initialize_blog_llm()
    conversation_instance = ConversationChain(llm=llm_instance, memory=memory_instance, verbose=True)

# Generate a response using the conversation chain
    response = conversation_instance.invoke(user_query)
    return response['response']

# Example usage (uncomment to test locally)
if __name__ == "__main__":
# Create memory instance
    chat_memory = create_conversation_memory()

# Simulate a user query
    user_input = "Hi, what is the role of Generative AI in content creation?"
    response = manage_blog_conversation(user_input, chat_memory)
    print("Chatbot Response:", response)
Understanding the Frontend Components
The frontend is critical for delivering a user-friendly experience, ensuring users can easily engage with the blog assistant, view past interactions, and receive immediate responses. Here are the main parts of the code and why they are essential:
Importing Streamlit and Backend Modules:
We import streamlit to build the web-based interface and our backend file (renamed for clarity as chatbot_backend or cb) to access the conversational logic. This step is fundamental because it establishes the connection between the UI and the AI processing backend, enabling real-time, interactive functionality. Without these imports, we wouldn’t have the tools to create or link the interface.
Setting the Chatbot Title:
Using st.title, we define a visually appealing title for the chatbot (e.g., “Hi, This is Chatbot BlogBot :sunglasses:”). This is important for branding and user engagement, making the interface welcoming and recognizable. Streamlit’s support for emojis and markdown allows for a polished, modern look that enhances user experience. You can customize the title to reflect your project’s identity or audience (e.g., “BlogBot: Your AI Writing Companion”).
Initializing LangChain Memory in Session State:
We use Streamlit’s st.session_state to persist the LangChain ConversationSummaryBufferMemory across page refreshes. This step is vital for maintaining conversation context, ensuring the chatbot remembers previous interactions even as Streamlit re-runs the script on every user action (a core behavior of Streamlit’s reactive framework). Without this, the chatbot would lose context, breaking the continuity of multi-turn conversations.
Managing Chat History in Session State:
We store the chat history (user queries and assistant responses) in st.session_state.chat_history to preserve previous messages. This is crucial for displaying a continuous conversation thread, enhancing user experience by showing the full context of the dialogue. It ensures the interface remains interactive and user-friendly, mimicking popular chat applications.
Re-rendering Chat History:
We loop through st.session_state.chat_history to display all previous messages using st.chat_message and st.markdown. This step is important because Streamlit re-executes the script on every interaction, so we need to re-render the chat history to maintain visual continuity. It creates a seamless, chat-like experience, preserving the conversation even as the underlying script refreshes.
Handling User Input and Displaying Responses:
Using st.chat_input, we create an input box for users to enter queries (e.g., “Powered by Bedrock and Claude”). When a user submits a query, we display it, call the backend to generate a response, and show the response in the chat interface using st.chat_message. This is essential for real-time interaction, connecting the frontend to the backend logic and ensuring immediate, context-aware feedback for users. It leverages Streamlit’s built-in chat features for a modern, intuitive design.
Together, these components create a dynamic, interactive frontend that works hand-in-hand with the backend to deliver a conversational blog assistant. Now, let’s look at a detailed code snippet you can use in your development environment, along with testing and deployment guidance.
Sample Frontend Code Snippet
Below is a Python script for the frontend, which you can run in VS Code or your preferred IDE after setting up the prerequisites and backend. Ensure you have installed streamlit via pip install streamlit and saved the backend code as chatbot_backend.py. Run this script with streamlit run your_file.py to launch the web interface locally.
python
# Import Streamlit for the frontend and the backend chatbot logic
import streamlit as st
import chatbot_backend as cb# Import your backend file as cb (Chatbot Backend)

# 1. Set the title for the chatbot (not mandatory)
st.title("Chatbot BlogBot")# Customize this based on your project’s branding

# 2. Initialize LangChain memory in session state
if 'memory' not in st.session_state:
    st.session_state.memory = cb.create_conversation_memory()# Use the renamed backend function

# 3. Initialize chat history in session state
if 'chat_history' not in st.session_state:
    st.session_state.chat_history = []

# 4. Add chat history to preserve previous messages
for message in st.session_state.chat_history:
    with st.chat_message(message["role"]):
        st.markdown(message["text"])

# 5. Create input box for user queries
user_query = st.chat_input("Input your query")

if user_query:
# Display the user's message
    with st.chat_message("user"):
        st.markdown(user_query)

# Append the user's message to chat history
    st.session_state.chat_history.append({"role": "user", "text": user_query})

# Call the backend to generate a response using the renamed function
    bot_response = cb.manage_blog_conversation(user_query, st.session_state.memory)# Use the renamed backend function

# Display the chatbot's response
    with st.chat_message("assistant"):
        st.markdown(bot_response)

# Append the chatbot's response to chat history
    st.session_state.chat_history.append({"role": "assistant", "text": bot_response})

How to Run the Code
In the terminal, navigate to your project folder and run the following command to launch the Streamlit app:
streamlit run chatbot_frontend.py
This will open a web browser with the chatbot interface . Enter queries in the chat input box (e.g., “Write a 200 word article on Generative AI”) to interact with the chatbot. The interface will display your messages and the bot’s responses in real time, maintaining conversation history.
Closing thoughts
With the backend and frontend implemented and tested, you’ve built a powerful, interactive conversational blog assistant that leverages the latest in Generative AI on the cloud. This application demonstrates how LangChain, AWS Bedrock, and Streamlit can work together to create a seamless, context-aware AI experience for users, from generating blog ideas to answering questions about content creation. Whether you’re a developer, product manager, or AI enthusiast, this hands-on project showcases the potential of cloud-based Generative AI to transform workflows and engage audiences.
What’s Coming
In Part 4 of the “Generative AI on Cloud” series, we’ll shift from hands-on implementation to a deeper conceptual exploration of advanced techniques to enhance our blog assistant. We’ll dive into vector databases and embeddings, exploring how these technologies enable retrieval-augmented generation (RAG) to make our AI more accurate, context-aware, and domain-specific. Stay tuned as we unlock the next level of intelligence for your cloud-based AI solutions!